Showing posts with label blogger. Show all posts

How to make a Sticky Post in Blogger blog. OeetBlog

Every blogger wants to put his better content on top of the Home page. Because, audience wants to know, that’s why they love good content. When a visitor gets in your blog and first time saw better something else. If you are a blogger and using blogspot platform, this post is for you. You can do it very easily and less time to make a sticky post. Today I'm showing you how you can put your post on top of the author page. Let's do start; basically you can make a sticky post using two ways (Path 1&2). I'll show you both, you can use which one you like best for your blog. 


  • "Log in" your Blogger account (here you see your blogger "Dashboard") > Select "New Post".
Select New Post
  • Write your post here and Publish it.
Click on Publish
  • After publish your post go to "Dashboard" again > Select "more option" (here you can see all the option on Blogger) select "Post".
    Click on Posts
  • It will sh ow you all the post what are you publish already. Choose your post which one you highlight on top in your author page. After choosing the post click on "Edit". 
    Click on Edit
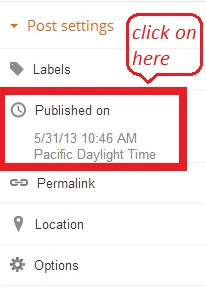
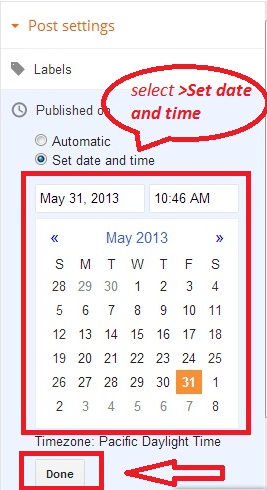
  •  You see "Post setting" right site on the page. Click on "Published on" then select "Set date and time".

Select Published onSet date and time
  • Now Select the Date till you will sticky on your post.

Click on Done

 Everything is done. Your post is now sticky, it'll show on top of page. Before you leave this page, just click on "Done".


  • "Log in" your Blogger account (here you see your Blogger "Dashboard") > Select "New Post" (In the above, I'm showing how you do it PATH 1). Write your post on here. After finish your writing click on HTML, what I'm showing on bellows picture.
Write on post HTML
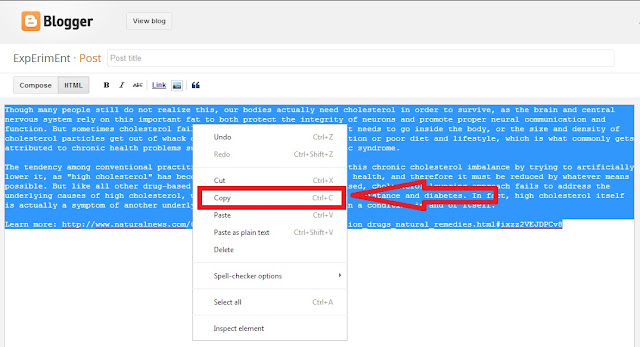
  • Select all the HTML code and copy the HTML code.
Copy the HTML code
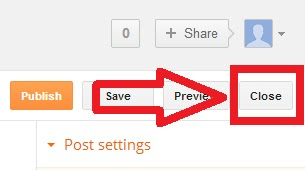
  • After copy the HTML code. Click on "Close" (which is right site on your page). It will turn you on your Blogger "Dashboard".
HTML close

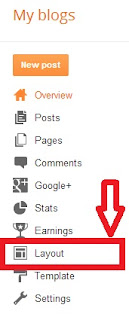
  • Look at your Dashboard left site. You can see Blogger option and click on "Layout".
Choose Layout
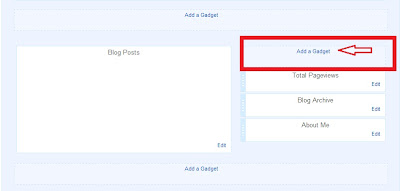
  • Click "add a gadget"
Select Add a gadget
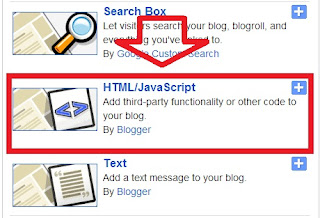
  • You can see a pop-up window. There have gadget category, choose on "HTML/JavaScript"
select HTML/JavaScript
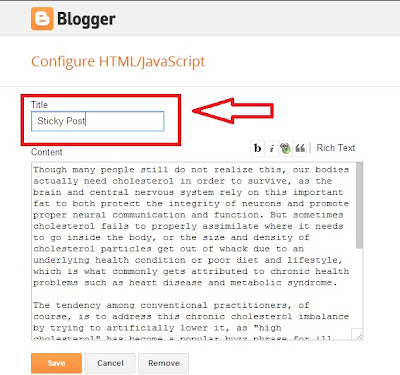
  • In the "content" box past the HTML code (Ctrl+v or click on mouse right button and select past) which copied before.
Past HTML code
  • Write a title in "Title" box.

Write a title


  • Click on "Save" button. 
Save gadget
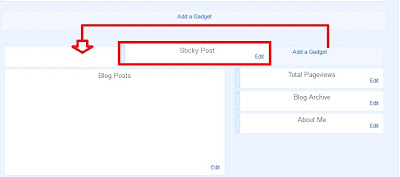
  • Now you can see your "Layout" page again. Just drag it (Sticky Post gadget) and place above "Blog Post"

Drag gadget and place
  • Click on "Save arrangement" which have above right site on your page. You are successfully done it.
 Save arrangment
Now you can view your blog. Your sticky post showing on top of the author page. 


If you need more help, leave me a comment.

How easily you make your personal blog without any cost. OeetBlog

A large number of people who use Internet, they have a personal or multiple blog. By the blogging someone share their personal info like text, photos, music, videos etc. Someone post free tutorial, articles and someone makes business and earns money from blog. You can also customize the blog as your wish. If you have a better blog, you are a most valuable person in online world. Now I'm showing you how easily you make your personal blog without any cost.


Necessary element to start a blog:

  • Good writing skill & A Gmail account                  
    Create an account
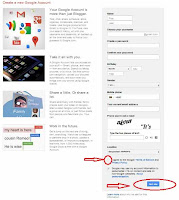
Both are enough to start a nice blog. If you don't have a personal Gmail account, just go ahead and create a Gmail account. It's necessary to make a blogger free blog. Blogger is a Google service that's why you have to Gmail account. It's simple to make a Google or Gmail account. Just go here www.gmail.com and click "Create an Account" button. Now you got a see the form in below. Just fill up the information properly user name, password, a phone number, give captcha code and tick below agreement finely click next step.  
Sign up formBasic formality is over. Now finish all the step next and sign in your Gmail account to verify it. Check your account and make sure everything is okay. It's the procedure to make a Gmail account. 
Now what? 
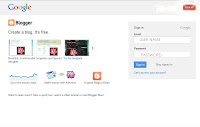
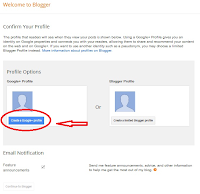
blogger.com Log in pageNow go to the link blogger.com. Give the e-mail and password (your Gmail address & password that is  already created just before). Click Sign in button found the page that is below. Click the button in red circle, which is "Create Google + profile" (Here is shown two option you must choose "Create Google+ profile" other option is so much limited). Give your own information. Confirm your profile to press the red mark circle button "continue to blogger". Click the New blog button, which is shown in bellow's picture. Make a title for your blog.

Confirm your profile
Note: Remember when you create a new blogger profile don't use your essential or regular Gmail account. Create a new Gmail only for your blog. If you use your regular Gmail account, it create an embracing situation that's much painful for  your maintenance.  

Choosing a Name for your blog:

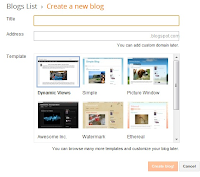
Create a new blogYour Blog name is a big fact to introduce on your position. There are many reason to think about this like as what type of blog you want to create, what type of idea or content you want to reflect on your blog & what type of  viewer you want to reach, first time you decide what about you want to do on your blog. Than chose a related name for your blog. Mind it your blog name should be small, easiest & meaningful, that dose remember anyone. Don't choose complex, unused, number & unreadable word that's creating apathy on your viewers. While you submit your site in a scarce engine a friendly name help you well result by search.  

Choose a template: 

Choosing a good looking, flexible & friendly template. Everyone looked pleasing design & good looking face, so suitable template is important to generate good traffic.
Your title name, blog address and template are ready. Now click in below "create blog" button. Your blog is now ready. You can start writing for your blog... 

How to Backup and Restore your Blogger Template. OeetBlog

Hi friends, I'm back again to notice you something else. If you are a blogger in blogspot platform and love to customize and modification blogger template. It's necessary to backup your blogger template. Because this backup saves your original template and saves your all data.
Why it is important?
Every blogger wants to make his blog looking so good and users friendly. That's why blogger make necessary changes like that include some extra HTML, CSS or JavaScript code sometimes added extra widget. There can be happened any kind of wrong, error or mistake. It's very difficult to find out the HTML code of the template of blogger. Though it's possible, but it's kill your lots of time. You didn't get your lost data with previous saving. Remember that when you try to make any kind of changes of your blog you should be backup your template.
How to backup blogger template?
Always make a habit to back up blog template if you love customize, modify and editing your blog. I think you are clear that blogger template backup how important is. Now I'll show you step by step how to backup and restore your blogger template. It's very simple, just flow the bellows instruction. 

  • First go to Blogger Dashboard> and Select Template.

Select Template
  • Press Backup/Restore button located at the top right corner.

Press Backup/Restore button
  • A pop-up window will appear, showing you two option. Click on >Download full template button

Click on >Download full template button
You are done. Your template is successfully store in your computer. Conform it in a safe place. Now let see how to restore your blogger template. 
How to restore blogger template?
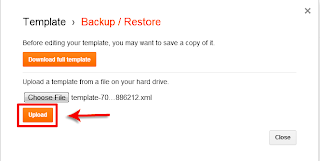
To restore your blogger template just repeat above instruction; go to your Blogger Dashboard> and Select Template. Then Press Backup/Restore button. Then click on Choose File button then select your old backup template and Click Upload button.

Click Upload button.
I think all of you understand, it's very simple and easy to backup and restore your blogger template. I'll show you more and more blogging tips regularly.

If you need more help, leave me a comment.