How to make a Sticky Post in Blogger blog. OeetBlog

Every blogger wants to put his better content on top of the Home page. Because, audience wants to know, that’s why they love good content. When a visitor gets in your blog and first time saw better something else. If you are a blogger and using blogspot platform, this post is for you. You can do it very easily and less time to make a sticky post. Today I'm showing you how you can put your post on top of the author page. Let's do start; basically you can make a sticky post using two ways (Path 1&2). I'll show you both, you can use which one you like best for your blog. 


  • "Log in" your Blogger account (here you see your blogger "Dashboard") > Select "New Post".
Select New Post
  • Write your post here and Publish it.
Click on Publish
  • After publish your post go to "Dashboard" again > Select "more option" (here you can see all the option on Blogger) select "Post".
    Click on Posts
  • It will sh ow you all the post what are you publish already. Choose your post which one you highlight on top in your author page. After choosing the post click on "Edit". 
    Click on Edit
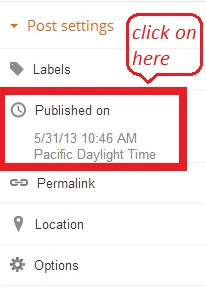
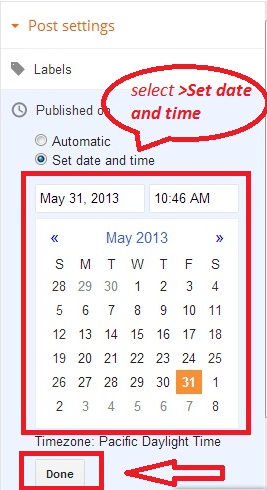
  •  You see "Post setting" right site on the page. Click on "Published on" then select "Set date and time".

Select Published onSet date and time
  • Now Select the Date till you will sticky on your post.

Click on Done

 Everything is done. Your post is now sticky, it'll show on top of page. Before you leave this page, just click on "Done".


  • "Log in" your Blogger account (here you see your Blogger "Dashboard") > Select "New Post" (In the above, I'm showing how you do it PATH 1). Write your post on here. After finish your writing click on HTML, what I'm showing on bellows picture.
Write on post HTML
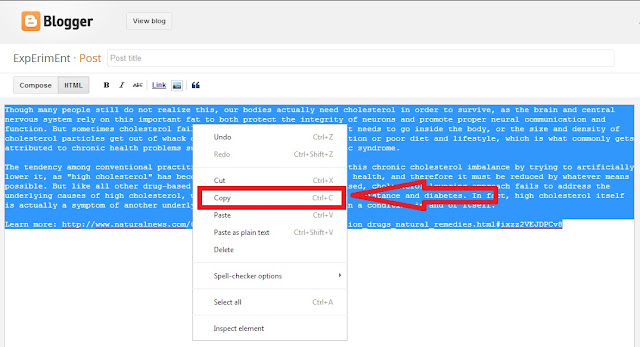
  • Select all the HTML code and copy the HTML code.
Copy the HTML code
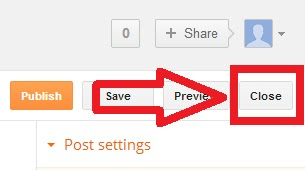
  • After copy the HTML code. Click on "Close" (which is right site on your page). It will turn you on your Blogger "Dashboard".
HTML close

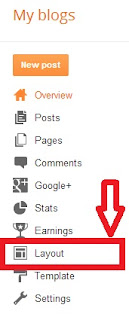
  • Look at your Dashboard left site. You can see Blogger option and click on "Layout".
Choose Layout
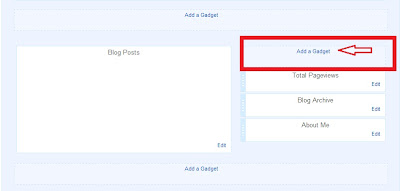
  • Click "add a gadget"
Select Add a gadget
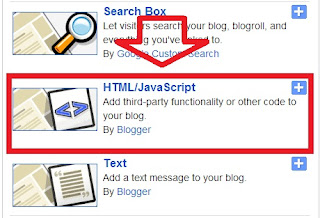
  • You can see a pop-up window. There have gadget category, choose on "HTML/JavaScript"
select HTML/JavaScript
  • In the "content" box past the HTML code (Ctrl+v or click on mouse right button and select past) which copied before.
Past HTML code
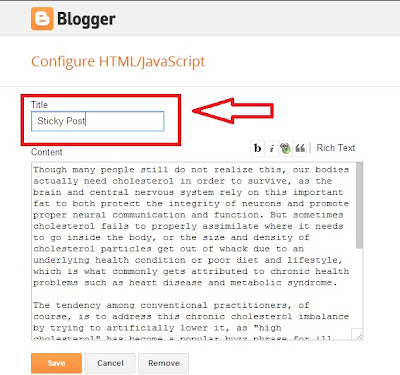
  • Write a title in "Title" box.

Write a title


  • Click on "Save" button. 
Save gadget
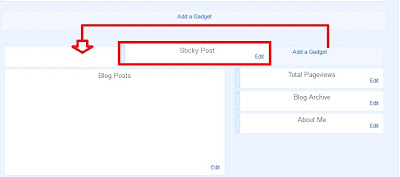
  • Now you can see your "Layout" page again. Just drag it (Sticky Post gadget) and place above "Blog Post"

Drag gadget and place
  • Click on "Save arrangement" which have above right site on your page. You are successfully done it.
 Save arrangment
Now you can view your blog. Your sticky post showing on top of the author page. 


If you need more help, leave me a comment.

Quality content makes your blog highness. OeetBlog


Quality content
Blogging is always demand high quality content for build up audience. Without content you cannot do anything in blogging. If you want to see your blog highness & want to make more money, quality content is better solution. Blogging experts define that; content is 'king' and you heard  this many time. People looking for better something. They want to know, want to learn, what about they thought. Why will readers coming back for more? Why Readers want to like to and share better quality content? Better content not only makes audience, but it also brings SEO (Search Engine Optimization) benefits. This is help you build up good page rank in search engine. Over 100 million blogs grow up. When you make a blog & start writing, I notice you that 100 million blogger is on there. They would be contest with you. When you write content keep in your mind & make sure bellows point.


  • Clear meaning: Audience wants clear concepts and particular information about the thing he search es on your blog. When a reader get in your blog attracted by your content title, and he didn't understand in the whole article. After this situation he didn't come back in your blog again for any info.
  •  Self-writing: When you become a blogger it's require good writing skill and better knowledge what about you write. There are lot of blogger create article about on your topic that is you choose. When you start writing it should be your own writing style other then it's goes to be similar other blogger. Search engine always demand unique content. So you write your topic in your self-writing style.
  • Stay with topic: You should give to the audience what he wants. He wants to know what you sooth to say reflect in your topic title. If you are continue a baseball blog and your topic is "Southwest Airlines to offer football, baseball games via Wi-Fi". Your writing started about -- I'm playing hooky. It's Thursday around noon, and a column is due, but it's 1970 and I'm playing hooky. I'm watching baseball. Gloriously sunny, rapturously dramatic, midweek playoff baseball. I'm sitting in my living room in the middle of the day watching the San Francisco Giants playing. Think about it, you want to be a baseball blogger and write other something then your reader didn't come back again because you make a false article that is not similar of your title what is you given on.
  •  Helpful for reader: All blogger's know that readers are blog's breath. As a blogger you keep in your mind all the time audience makes you highness. So when you write something it should be helpful for your reader. If you help your readers they will be happy and they will back again your blog, they will share it in their friend circle.

Content is assuredly a vital thing that is increase blog's image and value. If you have a nice design and theme, but content is in-apposite and not informative, then visitors will never come back again to your blog. There is only way to turn visitors into readers is to give them offerings and give them something you know better.     


How to add meta tags to your blogger(blogspot) blog. OeetBlog


Meta tag is an important part for your blog SEO (Search Engine Optimization). Basically it’s an HTML code, it’s use to provide your data to search engine.  When you submit your meta tag it’s explore data to search engine (like Google, Yahoo, Bing etc.) and tell about your site what is happening here. Meta tags provide data for make correct index in the search engine and search engine help audience to find your site. It’s help you to get more and more audience. Whatever now if you want to setup simple Meta tag in your blog, just follows the bellow instruction. 

1. Sign in your blogger blog then go to template, now click on Edit HTML 

2. Find this code: 


<b:include data='blog' name='all-head-content'/>                                              

3. Now add bellows code after the above code: 

<meta content='YOUR SITE DESCRIPTION HERE'name='description'/>
<meta content='YOUR KEYWORDS HERE'name='keywords'/>
<meta content='AUTHOR NAME HERE'name='author'/>

4Look at the bellows example:

Tempate>Edit HTML code

5.  Now replace the red color:

YOUR SITE DESCRIPTION HERE: Write your blog description (at 160 words)
KEYWORDS: Write the keywords of your blog (If many give , to divide eatch)
AUTHOR NAME: Write blog author’s name or your name

6. Now save your template, you have successfully done . 

If you need more help, leave me a comment.

Make a short plan before you start a blog. Oeet Blog


Before you start a blog
A blog is a big sector to make a place in online. When you start a blog, many kinds of matter you should maintain obviously. Like as content writing, blog design, communicate with viewer, traffic control etc. There for you should expand lot of time for your blog, if you want to success it's necessary to do work. First of all you must define why you start a blog? & where you want to go on? Fix your niche & to do a short list that is your work plan. It is helpful to go ahead rapidly. What do you want by a blog; do you want to introduce you as an establish person in your position? Do you promote your business? Do you want to share your idea or thinking? Do you want to post your photo or videos collection? Think your mind what type of work you have done well. Then note your thinking about the topic, research what is done by other writers! Remember that your blog should reflect your viewer expectation. All of audience find better something what is helpful, inspiring, throw a strong reference. Make sure you are capable to maintain a large number of audience & full-fill their expectation properly. When you seem I'm ready to maintain everything then you start all of activity...  
                                                                                                                                                                                                                      
If you want to be success, practice... practice... & practice; 

How easily you make your personal blog without any cost. OeetBlog

A large number of people who use Internet, they have a personal or multiple blog. By the blogging someone share their personal info like text, photos, music, videos etc. Someone post free tutorial, articles and someone makes business and earns money from blog. You can also customize the blog as your wish. If you have a better blog, you are a most valuable person in online world. Now I'm showing you how easily you make your personal blog without any cost.


Necessary element to start a blog:

  • Good writing skill & A Gmail account                  
    Create an account
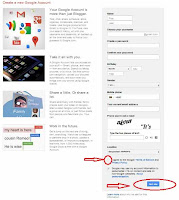
Both are enough to start a nice blog. If you don't have a personal Gmail account, just go ahead and create a Gmail account. It's necessary to make a blogger free blog. Blogger is a Google service that's why you have to Gmail account. It's simple to make a Google or Gmail account. Just go here www.gmail.com and click "Create an Account" button. Now you got a see the form in below. Just fill up the information properly user name, password, a phone number, give captcha code and tick below agreement finely click next step.  
Sign up formBasic formality is over. Now finish all the step next and sign in your Gmail account to verify it. Check your account and make sure everything is okay. It's the procedure to make a Gmail account. 
Now what? 
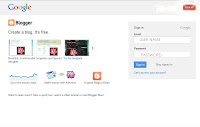
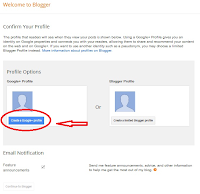
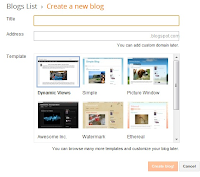
blogger.com Log in pageNow go to the link blogger.com. Give the e-mail and password (your Gmail address & password that is  already created just before). Click Sign in button found the page that is below. Click the button in red circle, which is "Create Google + profile" (Here is shown two option you must choose "Create Google+ profile" other option is so much limited). Give your own information. Confirm your profile to press the red mark circle button "continue to blogger". Click the New blog button, which is shown in bellow's picture. Make a title for your blog.

Confirm your profile
Note: Remember when you create a new blogger profile don't use your essential or regular Gmail account. Create a new Gmail only for your blog. If you use your regular Gmail account, it create an embracing situation that's much painful for  your maintenance.  

Choosing a Name for your blog:

Create a new blogYour Blog name is a big fact to introduce on your position. There are many reason to think about this like as what type of blog you want to create, what type of idea or content you want to reflect on your blog & what type of  viewer you want to reach, first time you decide what about you want to do on your blog. Than chose a related name for your blog. Mind it your blog name should be small, easiest & meaningful, that dose remember anyone. Don't choose complex, unused, number & unreadable word that's creating apathy on your viewers. While you submit your site in a scarce engine a friendly name help you well result by search.  

Choose a template: 

Choosing a good looking, flexible & friendly template. Everyone looked pleasing design & good looking face, so suitable template is important to generate good traffic.
Your title name, blog address and template are ready. Now click in below "create blog" button. Your blog is now ready. You can start writing for your blog... 

Add social network widget in blogger. OeetBlog

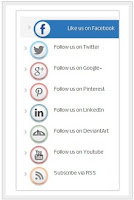
Social Network widget demo pic
Widget Demo

What is social media or network?

Social media refer to the communication instrument. While people create, share and exchange information in a virtual network. Facebook is a social media, it's provide people to shearing there status, photo, videos  event lots of activities. Radically Facebook become an easy communication system with each others. Social media also support us to make a strong virtual community and build links in to SEO effort.

Why you should add a social network widget?

Social media is an important part for blogging.  Social networks can bring lot of visitors for your blog. SEO(Search Engine Optimization) &amp; SMM(Social Media Marketing) both are same important to me for blogging. Social network widget help to insert Social Network Icon on your blog. It's reflect your activity on other community and inspire people to join your site become a visitors. Use the most innovative social network and share in this platform for your blog.

How can you add social media or network?

It's an easy formula to add social media on your site or blog. Now I can help you to ad social media in your blogger site. 
  • At first "login" your blogger Dashboard.
  • Click on the drop-dawn menu and select "laout" option.
  • Then select "add a gadget".
Add social network widget in blogger. OeetBlog

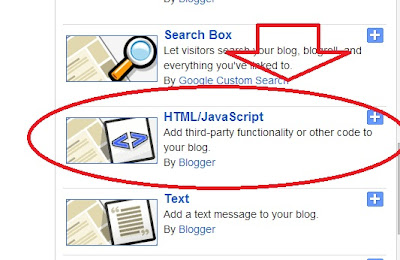
  • Find "HTML/JavaScript" element from the pop-up gadget list. Now click on "HTML/JavaScript".
Add social network widget in blogger. OeetBlog

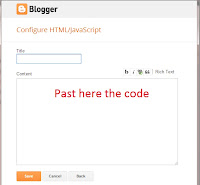
  • Now copy the code in below and past it "content" box.
Add social network widget in blogger. OeetBlog

<!--"Social Network" Widget By http://oeetblog.blogspot.com-->;
<style>
#MoreBlogTools-SNS {
width: 260px;
margin: 5px 20px;
padding:5px;
}
#MoreBlogTools-SNS li {
cursor: pointer;
height: 48px;
position: relative;
list-style-type: none;
}
#MoreBlogTools-SNS .icon {
background: #D91E76 url('http://3.bp.blogspot.com/-unjaHZfdU1k/UK7b1J4pfOI/AAAAAAAAAzA/r7ccqS2FovU/s1600/MoreBlogTools-SNS.png') 0 0 no-repeat;
background-color: rgba(217, 30, 118, .42);
border-radius: 30px;
display: block;
color: #141414;
float:none;
height: 48px;
line-height: 48px;
margin: 5px 0;
position: relative;
text-align: left;
text-indent: 90px;
text-shadow: #333 0 1px 0;
white-space: nowrap;
width: 48px;z-index: 5;
-webkit-transition: width .25s ease-in-out, background-color .25s ease-in-out;
-moz-transition: width .25s ease-in-out, background-color .25s ease-in-out;
-o-transition: width .25s ease-in-out, background-color .25s ease-in-out;
transition: width .25s ease-in-out, background-color .25s ease-in-out;
-webkit-box-shadow: rgba(0, 0, 0, .28) 0 2px 3px;
-moz-box-shadow: rgba(0,0,0, .28) 0 2px 3px; -o-box-shadow: rgba(0,0,0, .28) 0 2px 3px;
box-shadow: rgba(0, 0, 0, .28) 0 2px 3px;
text-decoration: none;
}
#MoreBlogTools-SNS span:hover {
visibility: hidden;
}
#MoreBlogTools-SNS span {
display: block;
top: 15px;position: absolute;
left: 90px;
}
#MoreBlogTools-SNS .icon {
color: #fafafa;
overflow: hidden;
}
#MoreBlogTools-SNS .fb {
background-color: rgba(45,118,185, .42);
background-position: 0 -382px;
}
#MoreBlogTools-SNS .twit {
background-color: rgba(0, 161, 223, .42);
background-position: 0 -430px;
}
#MoreBlogTools-SNS .google {
background-color: rgba(167, 0, 0, .42);
background-position: 0 -478px;
}
#MoreBlogTools-SNS .pint {
background-color: rgba(204, 0, 0, .42);
background-position: 0 -526px;
}
#MoreBlogTools-SNS .linked {
background-color: rgba(0, 87, 114, .42);
background-position: 0 -574px;
}
#MoreBlogTools-SNS .deviant {
background-color: rgba(76, 122, 74, .42);
background-position: 0 -622px;
}
#MoreBlogTools-SNS .ytube {
background-color: rgba(170, 0, 0, .42);
background-position: 0 -670px;
}
#MoreBlogTools-SNS .rss {
background-color: rgba(255,109, 0, .42);
background-position: 0 -718px;
}
#MoreBlogTools-SNS li:hover .icon {
width: 250px;
}
#MoreBlogTools-SNS li:hover .icon {
background-color: #d91e76;
}
#MoreBlogTools-SNS li:hover .fb {
background-color: #2d76b9;
background-position: 0 2px;
}
#MoreBlogTools-SNS li:hover .twit {
background-color: #00A1DF;
background-position: 0 -46px;
}
#MoreBlogTools-SNS li:hover .google {
background-color: #A70000;
background-position: 0 -94px;
}
#MoreBlogTools-SNS li:hover .pint {
background-color: #C00;
background-position: 0 -142px;
}
#MoreBlogTools-SNS li:hover .linked {
background-color: #005772;
background-position: 0 -190px;
}
#MoreBlogTools-SNS li:hover .deviant {
background-color: #4C7A4A;
background-position: 0 -238px;
}
#MoreBlogTools-SNS li:hover .ytube {
background-color: #A00;
background-position: 0 -286px;
}
#MoreBlogTools-SNS li:hover .rss {
background-color: #EC5601;
background-position: 0 -334px;
}
#MoreBlogTools-SNS .icon:active {
bottom: -2px;-webkit-box-shadow: none;
-moz-box-shadow: none;
-o-box-shadow: none;
}
</style>
<ul id="MoreBlogTools-SNS">
<li ><a href="Facebook URL" class="icon fb">Like us on Facebook</a><span>Like us on Facebook</span>
</li>
<li ><a href="Twitter URL" class="icon twit" >Follow us on Twitter</a><span>Follow us on Twitter</span>
</li>
<li ><a href="Google+ URL" class="icon google" >Follow us on Google+</a><span>Follow us on Google+</span>
</li>
<li ><a href="Pinterest URL" class="icon pint">Follow us on Pinterest</a><span>Follow us on Pinterest</span>
</li>
<li ><a href="Linkedin URL" class="icon linked" >Follow us on LinkedIn</a><span>Follow us on LinkedIn</span>
</li>
<li ><a href="DeviantArt URL" class="icon deviant" >Follow us on DeviantArt</a><span>Follow us on DeviantArt</span>
</li>
<li ><a href="YouTube URL" class="icon ytube">Follow us on Youtube</a><span>Follow us on Youtube</span>
</li>
<li ><a href="RSS Feed URL" class="icon rss" >Subscribe via RSS</a><span>Subscribe via RSS</span>
</li>
</ul>
<!--"Social Network" Widget By http://oeetblog.blogspot.com-->;

You have almost done it. Now click on save button. Your social media widget are ready to go. Finally before you leave "layout'' page Click on "save arrangement" button.  
Add social network widget in blogger. OeetBlog


If you need more help, leave me a comment.

Why should you start a blog? OeetBlog

Why should you start a blog? OeetBlog
Eight month ago I was start my blogging carrier. When I decide, I make a blog. It's so much complex decision in my life. I didn't know what a blog is, how it work and why i start it. After that Google help me to go ahead. Now I'm blogger. I know what a blog is, how it work and why i start a blog. In the case I want to know you why you start a blog. There are many reason to make a blog. I want to show you 5 reasons to start a blog.  
  1. A good writer: A blog make you a good writer, because when you share a information with your blog you must be study for this post to make a better something. You try to make a better content other them. When you practice make a better part it lets feedback on your creation. When you get bake something it's make you more and more active in your work. You should be improving your writing skill and should be a good writer.     
  2. Make a popular person: Have you any idea? how it is possible? When you share some difference idea in your blog, your visitor make you awesome guy, you didn't about think. Day by bay comment through, email, social media meet you lot of person and it's brings lot of popularity in your extra ordinary idea shows. 
  3. Introduce the new face: Blog is a vary awesome media in online to make a good relationship. Everyday many visitors comes your site they makes comment, send email, communication with social media. Defiantly you surprised how faster people meet you and you meet with people. It is make you regular in your work and inspire you.
  4. Make an entrepreneur: If you are going to lead a social awareness or a online business. At first you need have a big community. You can make it by a blog, though social media to do this work, but I want to prefer blogging. Cause if you are a active worker in your platform you can easily change your life.
  5. Make extra money: You can get money by your blog. There are many way to earn money by a blog like Ad Sense, Chitika, Article publish, Affiliate marketing etc. If you want to know how you benefited to use your own blog. See the post: "How to make money by using a blog"

How to Backup and Restore your Blogger Template. OeetBlog

Hi friends, I'm back again to notice you something else. If you are a blogger in blogspot platform and love to customize and modification blogger template. It's necessary to backup your blogger template. Because this backup saves your original template and saves your all data.
Why it is important?
Every blogger wants to make his blog looking so good and users friendly. That's why blogger make necessary changes like that include some extra HTML, CSS or JavaScript code sometimes added extra widget. There can be happened any kind of wrong, error or mistake. It's very difficult to find out the HTML code of the template of blogger. Though it's possible, but it's kill your lots of time. You didn't get your lost data with previous saving. Remember that when you try to make any kind of changes of your blog you should be backup your template.
How to backup blogger template?
Always make a habit to back up blog template if you love customize, modify and editing your blog. I think you are clear that blogger template backup how important is. Now I'll show you step by step how to backup and restore your blogger template. It's very simple, just flow the bellows instruction. 

  • First go to Blogger Dashboard> and Select Template.

Select Template
  • Press Backup/Restore button located at the top right corner.

Press Backup/Restore button
  • A pop-up window will appear, showing you two option. Click on >Download full template button

Click on >Download full template button
You are done. Your template is successfully store in your computer. Conform it in a safe place. Now let see how to restore your blogger template. 
How to restore blogger template?
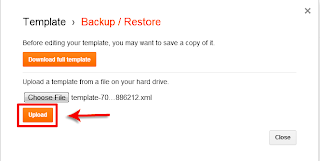
To restore your blogger template just repeat above instruction; go to your Blogger Dashboard> and Select Template. Then Press Backup/Restore button. Then click on Choose File button then select your old backup template and Click Upload button.

Click Upload button.
I think all of you understand, it's very simple and easy to backup and restore your blogger template. I'll show you more and more blogging tips regularly.

If you need more help, leave me a comment.

How to add Floating Social Media Sharing Buttons on Blogger. OeetBlog

Floating social media is an important part for blogging. Floating social media sharing buttons are wonderful way to increase visitor and promotion of blog content through social media networks. It's popular widget in top to bottom blogger society. If you want to quickly share your articles/content and increase your traffic rapidly than it's for you. Search engine is a vital for blogger. When you are using floating social media search engine can easily find out your blog article/content by the social bookmarking site. It'll bring for your blog huge number of visitor. Facebook, Twitter, StumbleUpon, Digg, Google+ and Rss Feed this media will increase your blog traffic 30% to 40% because this social media are most popular. You are already know that Facebook, twitter & Google+ as huge traffic source to increase your blog.  

    Click on add a gadget
  • Log in your blogger Dashboard (Click the drop-down menu)
  • Go to Layout option

Click on HTML/JavaScript
  • Click on add a gadget
  • Scroll down from the pop-up window and select HTML/JavaScript
Copy the code which is given below and past the code in content (empty) box.

<!-- floating share bar Start helplogger.blogspot.com--> <style type="text/css"> #pageshare {position:fixed; bottom:5%; margin-left:-721px; float:left; border-radius:5px;-moz-border-radius:5px;-webkit-border-radius:5px;background-color:#fff;padding:0 0 2px 0;z-index:10;} #pageshare .sbutton {float:left;clear:both;margin:5px 5px 0 5px;} .fb_share_count_top {width:48px !important;} .fb_share_count_top, .fb_share_count_inner {-moz-border-radius:3px;-webkit-border-radius:3px;} .FBConnectButton_Small, .FBConnectButton_RTL_Small {width:49px !important; -moz-border-radius:3px;/*bs-fsmsb*/-webkit-border-radius:3px;} .FBConnectButton_Small .FBConnectButton_Text {padding:2px 2px 3px !important;-moz-border-radius:3px;-webkit-border-radius:3px;font-size:8px;} </style> <div id='pageshare' title="Get this from Helpblogger.com">
<div style="margin-left:8px;"><div class='sbutton' id='like' style='margin: 5px 0 0 5px;'><script src='http://connect.facebook.net/en_US/all.js#xfbml=1'></script><fb:like layout='box_count' show_faces='false'></fb:like> </div></div>
<br /><div class='sbutton'><a class='twitter-share-button' data-count='vertical' data-via='
Your twitter username' expr:data-counturl='data:blog.url' href='http://twitter.com/share' rel='nofollow'>Tweet</a><script src='http://platform.twitter.com/widgets.js'; type='text/javascript'></script>
<br /><div class='sbutton' id='su'> <script src="http://www.stumbleupon.com/hostedbadge.php?s=5"></script> </div> <div class='sbutton' id='digg' style='margin-left:3px;width:48px'> <script src='http://widgets.digg.com/buttons.js' type='text/javascript'></script> <a class="DiggThisButton DiggMedium"></a> </div> <div class='sbutton' id='gplusone'> <script type="text/javascript" src="https://apis.google.com/js/plusone.js"></script> <g:plusone size="tall"></g:plusone></div><br/><a href='
http://feeds.feedburner.com/
Your Rss Url' rel='nofollow' target='_blank' title='Subscribe To Our Rss Feed'><img src='https://blogger.googleusercontent.com/img/b/R29vZ2xl/AVvXsEgreOolzXnl1j5rExk2LL1Mmv_IVsLHd90pKtsWNjc8oN-kzF7j73Rg4PRICY7cHhEBlqysKP6QzoBhCUfxZcnf1cWVtl63m8_CIOZ-dWQ7WserlaaVznDkLU2rujcQbgj1umWbFkPYjvqz/s1600/icon_rss_reader.png'/></a><div style="clear: both;font-size: 9px;text-align:center;">Get <a style="color: #3399BB;" href="http://oeetblog.blogspot.com/">widget</a></div><!-- Do not remove this link --> </div> <!-- floating share bar End --></div>

  • Finally save the gadget. 
Customization:


  1. Vertical alignment; You can change "margin-left:-721px; float:left;" to fix your browser window.
  2. Twitter setting; Type your username on 'vertical' data-via='Your twitter usernamehere.
  3. RSS Feed; Change the text in red with the Url address or your RSS Feed.
You are done. If you need more help, leave me a comment.

How to add a new page in blogger? OeetBlog

Hi friend, now I want to show you how can you create a new page in your blogger platform. "New Page" is an important part for every blogger, but sometimes newcomers are confused to create a page. Blogger makes it easy for beginner to create a new page link from your blog. You can do it from tabs or slide bar on your blog. Here are some limitation  like your new page shows only one page while your home page shows multiple page, static page haven't a label, are not indexed in archive page and you can create 10 pages.
You can solve this limitation other posses, I'll show you letter. Let's do start create new page... 

How to create static page:

  • First log in your blogger.com 
  • Click on drop down menu, and then click on blows circle"Page"
click on Page
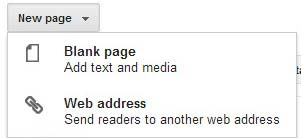
  • Click on new page button. There are two option shows "Blank page" and "Web address" choose "blank page" and click on. If you want to create other site link then you choose "Web address".
Click on blank page
  1. Blank page: Blank page makes a new page link URL within your blog.
  2. Web address: Web address makes a new link URL that is outside of your blog.
You can choose any option what you need. Now you want to create a new page so click on "Blank page".
 click on "Blank page"


  1. Give a title for your new page.
  2. Click the "Compose" button which is circle.
  3. Write about your page what do you want.
  4. Now click the "Publish" button to publish your page. Before you publish your page you can check your page by click preview button how to see your page.

Preview
Your new page is almost ready, now you have 3 options where you want to display your page. You can choose any of them.
  • Top tabs: Display your page on top navigation bar.


  • Side links: Display your page in your blog's side bar.


  • Don't show: It's makes manually link page on your blog. 


Finally you save your "page agreement".
page agreement
Your page is ready. If you create another one flow the same steps. 

Note: If you use third party templates this posses may not work pages as "top tabs", you can add as side bar.

Hopefully you are done. If you want more something or need more help, leave me a comment or e-mail.