Showing posts with label Gadget. Show all posts

How to make a Sticky Post in Blogger blog. OeetBlog

Every blogger wants to put his better content on top of the Home page. Because, audience wants to know, that’s why they love good content. When a visitor gets in your blog and first time saw better something else. If you are a blogger and using blogspot platform, this post is for you. You can do it very easily and less time to make a sticky post. Today I'm showing you how you can put your post on top of the author page. Let's do start; basically you can make a sticky post using two ways (Path 1&2). I'll show you both, you can use which one you like best for your blog. 


  • "Log in" your Blogger account (here you see your blogger "Dashboard") > Select "New Post".
Select New Post
  • Write your post here and Publish it.
Click on Publish
  • After publish your post go to "Dashboard" again > Select "more option" (here you can see all the option on Blogger) select "Post".
    Click on Posts
  • It will sh ow you all the post what are you publish already. Choose your post which one you highlight on top in your author page. After choosing the post click on "Edit". 
    Click on Edit
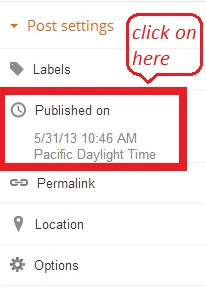
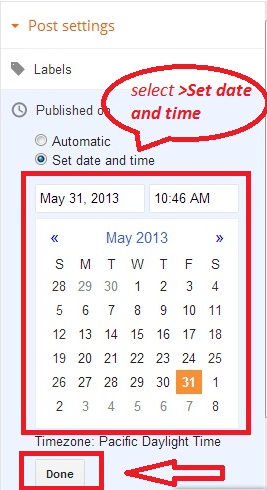
  •  You see "Post setting" right site on the page. Click on "Published on" then select "Set date and time".

Select Published onSet date and time
  • Now Select the Date till you will sticky on your post.

Click on Done

 Everything is done. Your post is now sticky, it'll show on top of page. Before you leave this page, just click on "Done".


  • "Log in" your Blogger account (here you see your Blogger "Dashboard") > Select "New Post" (In the above, I'm showing how you do it PATH 1). Write your post on here. After finish your writing click on HTML, what I'm showing on bellows picture.
Write on post HTML
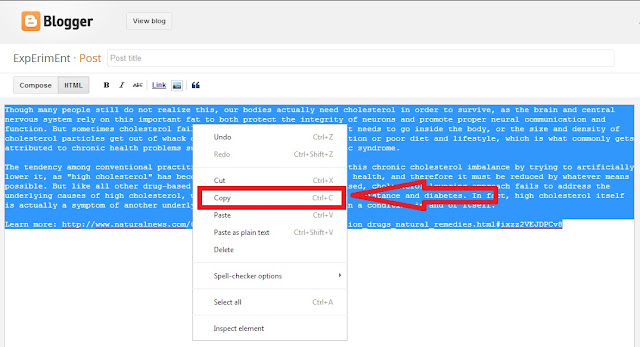
  • Select all the HTML code and copy the HTML code.
Copy the HTML code
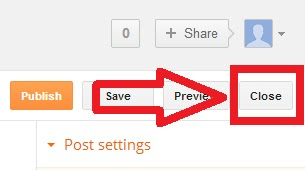
  • After copy the HTML code. Click on "Close" (which is right site on your page). It will turn you on your Blogger "Dashboard".
HTML close

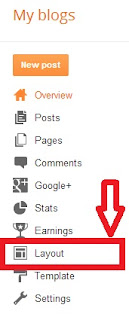
  • Look at your Dashboard left site. You can see Blogger option and click on "Layout".
Choose Layout
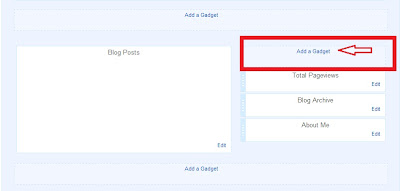
  • Click "add a gadget"
Select Add a gadget
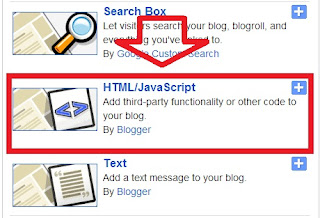
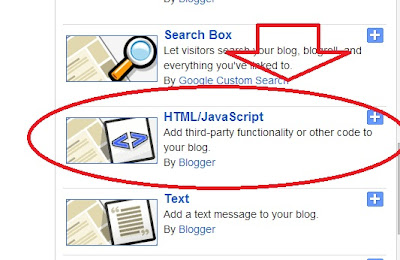
  • You can see a pop-up window. There have gadget category, choose on "HTML/JavaScript"
select HTML/JavaScript
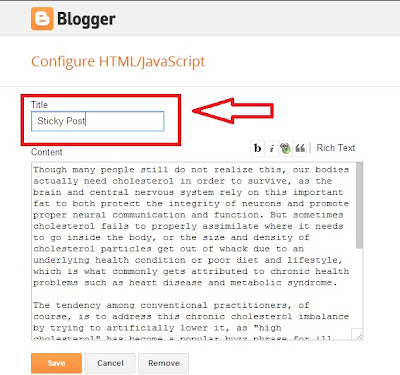
  • In the "content" box past the HTML code (Ctrl+v or click on mouse right button and select past) which copied before.
Past HTML code
  • Write a title in "Title" box.

Write a title


  • Click on "Save" button. 
Save gadget
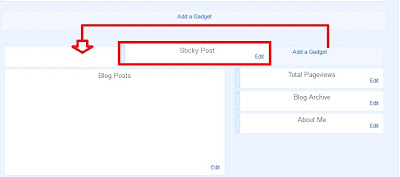
  • Now you can see your "Layout" page again. Just drag it (Sticky Post gadget) and place above "Blog Post"

Drag gadget and place
  • Click on "Save arrangement" which have above right site on your page. You are successfully done it.
 Save arrangment
Now you can view your blog. Your sticky post showing on top of the author page. 


If you need more help, leave me a comment.

Add social network widget in blogger. OeetBlog

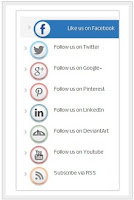
Social Network widget demo pic
Widget Demo

What is social media or network?

Social media refer to the communication instrument. While people create, share and exchange information in a virtual network. Facebook is a social media, it's provide people to shearing there status, photo, videos  event lots of activities. Radically Facebook become an easy communication system with each others. Social media also support us to make a strong virtual community and build links in to SEO effort.

Why you should add a social network widget?

Social media is an important part for blogging.  Social networks can bring lot of visitors for your blog. SEO(Search Engine Optimization) & SMM(Social Media Marketing) both are same important to me for blogging. Social network widget help to insert Social Network Icon on your blog. It's reflect your activity on other community and inspire people to join your site become a visitors. Use the most innovative social network and share in this platform for your blog.

How can you add social media or network?

It's an easy formula to add social media on your site or blog. Now I can help you to ad social media in your blogger site. 
  • At first "login" your blogger Dashboard.
  • Click on the drop-dawn menu and select "laout" option.
  • Then select "add a gadget".
Add social network widget in blogger. OeetBlog

  • Find "HTML/JavaScript" element from the pop-up gadget list. Now click on "HTML/JavaScript".
Add social network widget in blogger. OeetBlog

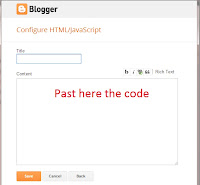
  • Now copy the code in below and past it "content" box.
Add social network widget in blogger. OeetBlog

<!--"Social Network" Widget By http://oeetblog.blogspot.com-->;
<style>
#MoreBlogTools-SNS {
width: 260px;
margin: 5px 20px;
padding:5px;
}
#MoreBlogTools-SNS li {
cursor: pointer;
height: 48px;
position: relative;
list-style-type: none;
}
#MoreBlogTools-SNS .icon {
background: #D91E76 url('http://3.bp.blogspot.com/-unjaHZfdU1k/UK7b1J4pfOI/AAAAAAAAAzA/r7ccqS2FovU/s1600/MoreBlogTools-SNS.png') 0 0 no-repeat;
background-color: rgba(217, 30, 118, .42);
border-radius: 30px;
display: block;
color: #141414;
float:none;
height: 48px;
line-height: 48px;
margin: 5px 0;
position: relative;
text-align: left;
text-indent: 90px;
text-shadow: #333 0 1px 0;
white-space: nowrap;
width: 48px;z-index: 5;
-webkit-transition: width .25s ease-in-out, background-color .25s ease-in-out;
-moz-transition: width .25s ease-in-out, background-color .25s ease-in-out;
-o-transition: width .25s ease-in-out, background-color .25s ease-in-out;
transition: width .25s ease-in-out, background-color .25s ease-in-out;
-webkit-box-shadow: rgba(0, 0, 0, .28) 0 2px 3px;
-moz-box-shadow: rgba(0,0,0, .28) 0 2px 3px; -o-box-shadow: rgba(0,0,0, .28) 0 2px 3px;
box-shadow: rgba(0, 0, 0, .28) 0 2px 3px;
text-decoration: none;
}
#MoreBlogTools-SNS span:hover {
visibility: hidden;
}
#MoreBlogTools-SNS span {
display: block;
top: 15px;position: absolute;
left: 90px;
}
#MoreBlogTools-SNS .icon {
color: #fafafa;
overflow: hidden;
}
#MoreBlogTools-SNS .fb {
background-color: rgba(45,118,185, .42);
background-position: 0 -382px;
}
#MoreBlogTools-SNS .twit {
background-color: rgba(0, 161, 223, .42);
background-position: 0 -430px;
}
#MoreBlogTools-SNS .google {
background-color: rgba(167, 0, 0, .42);
background-position: 0 -478px;
}
#MoreBlogTools-SNS .pint {
background-color: rgba(204, 0, 0, .42);
background-position: 0 -526px;
}
#MoreBlogTools-SNS .linked {
background-color: rgba(0, 87, 114, .42);
background-position: 0 -574px;
}
#MoreBlogTools-SNS .deviant {
background-color: rgba(76, 122, 74, .42);
background-position: 0 -622px;
}
#MoreBlogTools-SNS .ytube {
background-color: rgba(170, 0, 0, .42);
background-position: 0 -670px;
}
#MoreBlogTools-SNS .rss {
background-color: rgba(255,109, 0, .42);
background-position: 0 -718px;
}
#MoreBlogTools-SNS li:hover .icon {
width: 250px;
}
#MoreBlogTools-SNS li:hover .icon {
background-color: #d91e76;
}
#MoreBlogTools-SNS li:hover .fb {
background-color: #2d76b9;
background-position: 0 2px;
}
#MoreBlogTools-SNS li:hover .twit {
background-color: #00A1DF;
background-position: 0 -46px;
}
#MoreBlogTools-SNS li:hover .google {
background-color: #A70000;
background-position: 0 -94px;
}
#MoreBlogTools-SNS li:hover .pint {
background-color: #C00;
background-position: 0 -142px;
}
#MoreBlogTools-SNS li:hover .linked {
background-color: #005772;
background-position: 0 -190px;
}
#MoreBlogTools-SNS li:hover .deviant {
background-color: #4C7A4A;
background-position: 0 -238px;
}
#MoreBlogTools-SNS li:hover .ytube {
background-color: #A00;
background-position: 0 -286px;
}
#MoreBlogTools-SNS li:hover .rss {
background-color: #EC5601;
background-position: 0 -334px;
}
#MoreBlogTools-SNS .icon:active {
bottom: -2px;-webkit-box-shadow: none;
-moz-box-shadow: none;
-o-box-shadow: none;
}
</style>
<ul id="MoreBlogTools-SNS">
<li ><a href="Facebook URL" class="icon fb">Like us on Facebook</a><span>Like us on Facebook</span>
</li>
<li ><a href="Twitter URL" class="icon twit" >Follow us on Twitter</a><span>Follow us on Twitter</span>
</li>
<li ><a href="Google+ URL" class="icon google" >Follow us on Google+</a><span>Follow us on Google+</span>
</li>
<li ><a href="Pinterest URL" class="icon pint">Follow us on Pinterest</a><span>Follow us on Pinterest</span>
</li>
<li ><a href="Linkedin URL" class="icon linked" >Follow us on LinkedIn</a><span>Follow us on LinkedIn</span>
</li>
<li ><a href="DeviantArt URL" class="icon deviant" >Follow us on DeviantArt</a><span>Follow us on DeviantArt</span>
</li>
<li ><a href="YouTube URL" class="icon ytube">Follow us on Youtube</a><span>Follow us on Youtube</span>
</li>
<li ><a href="RSS Feed URL" class="icon rss" >Subscribe via RSS</a><span>Subscribe via RSS</span>
</li>
</ul>
<!--"Social Network" Widget By http://oeetblog.blogspot.com-->;

You have almost done it. Now click on save button. Your social media widget are ready to go. Finally before you leave "layout'' page Click on "save arrangement" button.  
Add social network widget in blogger. OeetBlog


If you need more help, leave me a comment.

How to add Floating Social Media Sharing Buttons on Blogger. OeetBlog

Floating social media is an important part for blogging. Floating social media sharing buttons are wonderful way to increase visitor and promotion of blog content through social media networks. It's popular widget in top to bottom blogger society. If you want to quickly share your articles/content and increase your traffic rapidly than it's for you. Search engine is a vital for blogger. When you are using floating social media search engine can easily find out your blog article/content by the social bookmarking site. It'll bring for your blog huge number of visitor. Facebook, Twitter, StumbleUpon, Digg, Google+ and Rss Feed this media will increase your blog traffic 30% to 40% because this social media are most popular. You are already know that Facebook, twitter & Google+ as huge traffic source to increase your blog.  

    Click on add a gadget
  • Log in your blogger Dashboard (Click the drop-down menu)
  • Go to Layout option

Click on HTML/JavaScript
  • Click on add a gadget
  • Scroll down from the pop-up window and select HTML/JavaScript
Copy the code which is given below and past the code in content (empty) box.

<!-- floating share bar Start helplogger.blogspot.com--> <style type="text/css"> #pageshare {position:fixed; bottom:5%; margin-left:-721px; float:left; border-radius:5px;-moz-border-radius:5px;-webkit-border-radius:5px;background-color:#fff;padding:0 0 2px 0;z-index:10;} #pageshare .sbutton {float:left;clear:both;margin:5px 5px 0 5px;} .fb_share_count_top {width:48px !important;} .fb_share_count_top, .fb_share_count_inner {-moz-border-radius:3px;-webkit-border-radius:3px;} .FBConnectButton_Small, .FBConnectButton_RTL_Small {width:49px !important; -moz-border-radius:3px;/*bs-fsmsb*/-webkit-border-radius:3px;} .FBConnectButton_Small .FBConnectButton_Text {padding:2px 2px 3px !important;-moz-border-radius:3px;-webkit-border-radius:3px;font-size:8px;} </style> <div id='pageshare' title="Get this from Helpblogger.com">
<div style="margin-left:8px;"><div class='sbutton' id='like' style='margin: 5px 0 0 5px;'><script src='http://connect.facebook.net/en_US/all.js#xfbml=1'></script><fb:like layout='box_count' show_faces='false'></fb:like> </div></div>
<br /><div class='sbutton'><a class='twitter-share-button' data-count='vertical' data-via='
Your twitter username' expr:data-counturl='data:blog.url' href='http://twitter.com/share' rel='nofollow'>Tweet</a><script src='http://platform.twitter.com/widgets.js'; type='text/javascript'></script>
<br /><div class='sbutton' id='su'> <script src="http://www.stumbleupon.com/hostedbadge.php?s=5"></script> </div> <div class='sbutton' id='digg' style='margin-left:3px;width:48px'> <script src='http://widgets.digg.com/buttons.js' type='text/javascript'></script> <a class="DiggThisButton DiggMedium"></a> </div> <div class='sbutton' id='gplusone'> <script type="text/javascript" src="https://apis.google.com/js/plusone.js"></script> <g:plusone size="tall"></g:plusone></div><br/><a href='
http://feeds.feedburner.com/
Your Rss Url' rel='nofollow' target='_blank' title='Subscribe To Our Rss Feed'><img src='https://blogger.googleusercontent.com/img/b/R29vZ2xl/AVvXsEgreOolzXnl1j5rExk2LL1Mmv_IVsLHd90pKtsWNjc8oN-kzF7j73Rg4PRICY7cHhEBlqysKP6QzoBhCUfxZcnf1cWVtl63m8_CIOZ-dWQ7WserlaaVznDkLU2rujcQbgj1umWbFkPYjvqz/s1600/icon_rss_reader.png'/></a><div style="clear: both;font-size: 9px;text-align:center;">Get <a style="color: #3399BB;" href="http://oeetblog.blogspot.com/">widget</a></div><!-- Do not remove this link --> </div> <!-- floating share bar End --></div>

  • Finally save the gadget. 
Customization:


  1. Vertical alignment; You can change "margin-left:-721px; float:left;" to fix your browser window.
  2. Twitter setting; Type your username on 'vertical' data-via='Your twitter usernamehere.
  3. RSS Feed; Change the text in red with the Url address or your RSS Feed.
You are done. If you need more help, leave me a comment.

How to add a hit counter in your (blogspot) blog. OeetBlog


How to add a hit counter in your (blogspot) blog. OeetBlogIf you want to add a hit counter in your (blogspot) blog, you can do it easily. That's help you to know how many visitor is coming everyday in your site. It also viewed publicly. I'll show you how easily you can do this step by step. Just follow the bellows instruction.

  • At first log in to your "Blogger" account> Go to "Dashboard"> Click on "more option" list and select "Layout"  
  • After selecting the "Layout" you will see bellows page. Then select "add a gedget".
Go to Layout> add a gadget
  • A Blogger (blogspot) pop-up window will arrive this lists the gadget that available to Blogger (blogspot). You select your inelastic gadget that is "Blog's stats".
Select Blog's stats 
  • It's show you variable design. You can choose anyone for your blog.


Display Blog's stats deaign
  • There have a time period option. That is All Time: It show you begging to end amount. Last 30 days: It's for Last 30 days update and Last 7 days for last week update. You can select as your choose.

Time period option
  • That's it. You done your goal. Now "save" your page.

Save your page
  • Never forget before you leave this Layout page click "save arrangement" button 

click save arrangement button
Hopefully you are done well. It's very simple task for every blogger. I'm trying to give you more and more effective post for help others... Just look at OeetBlog.

Note: Remember if you are a new blogger and you didn't get expected visitor, it's better for you if you do not use hit counter. Because when a new visitor gets in your site and saw low amount of visitor he will loses his interest to return your site. 

If you need more help, leave me a comment.